both DX11 and DX12 render modes
via Virtual Desktop chroma-key passthrough
PassthroughForge lets you carve see-through "windows" into your VR view - so you can glance at your real keyboard, HOTAS or instruments without taking the headset off. The trick that makes it easy: you don't draw blind on the desktop. You press Trace VR and get a passthrough view of your real cockpit right inside the headset - a canvas laid over reality. On that canvas you paint your masks and align them onto your cockpit, seeing exactly what you're doing the whole time. Follow these steps in order.
You set up at the PC, then put the headset on and stay in VR for the whole creation - drawing included.
Sit in your normal play position and recenter the headset one single time, before you enter the sim (on Quest: long-press the Oculus button). Your masks are anchored to this playspace - if you press the headset recenter again mid-session, the whole playspace moves and your masks will suddenly sit rotated or shifted. Inside the sim, always use the sim's own recenter instead: DCS → "Recenter VR View", MSFS → the VR Camera Reset binding - these re-center the cockpit without touching your playspace. And if you ever do recenter the headset deliberately, one press of Recenter All Masks (Ctrl+Del, re-bindable) snaps your masks back into place. Do your one-time recenter before you align and save masks, so their stored positions stay clean.
The Quest 3 has a small infrared proximity sensor between the lenses that pauses the headset - and can re-center your playspace - every time you take the headset off. While building masks you'll constantly flip the headset up to glance at the desktop and put it back on; each of those cycles can shift the playspace, and suddenly your masks no longer line up with the real cockpit even though nothing changed. A small strip of tape over the sensor keeps the headset awake and the playspace rock-solid for the whole session. Important: use light, reflective tape - white masking tape, silver duct tape or aluminum tape. Never black tape: the sensor measures reflected infrared light, and black absorbs it, so the headset goes to standby anyway. Personally, I just leave the tape on permanently - one less thing to think about.
One-time setup: Virtual Desktop
🖥️ At your PCPassthroughForge paints its masks in a special key colour, and Virtual Desktop swaps exactly that colour for the real passthrough cameras (chroma key). That only works if VD is configured for it - a one-time job. Open the Virtual Desktop menu inside the headset, go to the Streaming tab and set:
| Virtual Desktop setting (Streaming tab) | Value |
|---|---|
| VR Passthrough → Environment | enabled (checked) |
| VR Passthrough → Configure… → colour | Red 0 · Green 0 · Blue 180 (deep blue) |
| Similarity | 12 % |
| Smoothness | 12 % |
| Passthrough Opacity | 100 % |
| Advanced Options → Track controllers | ✓ checked (important!) |
| Advanced Options → Forward tracking data to PC | ✓ checked (important! - restart game/SteamVR after changing) |
These values are a known-good baseline - most "it doesn't work at all" reports turn out to be a Virtual Desktop default that's far away from these numbers. You can fine-tune Similarity and Smoothness later if your room lighting causes pink/blue rim artifacts at mask edges. And don't skip the last two: Track controllers and Forward tracking data to PC are what let PassthroughForge see your controllers at all - without them, controller placement and tracking simply won't work.
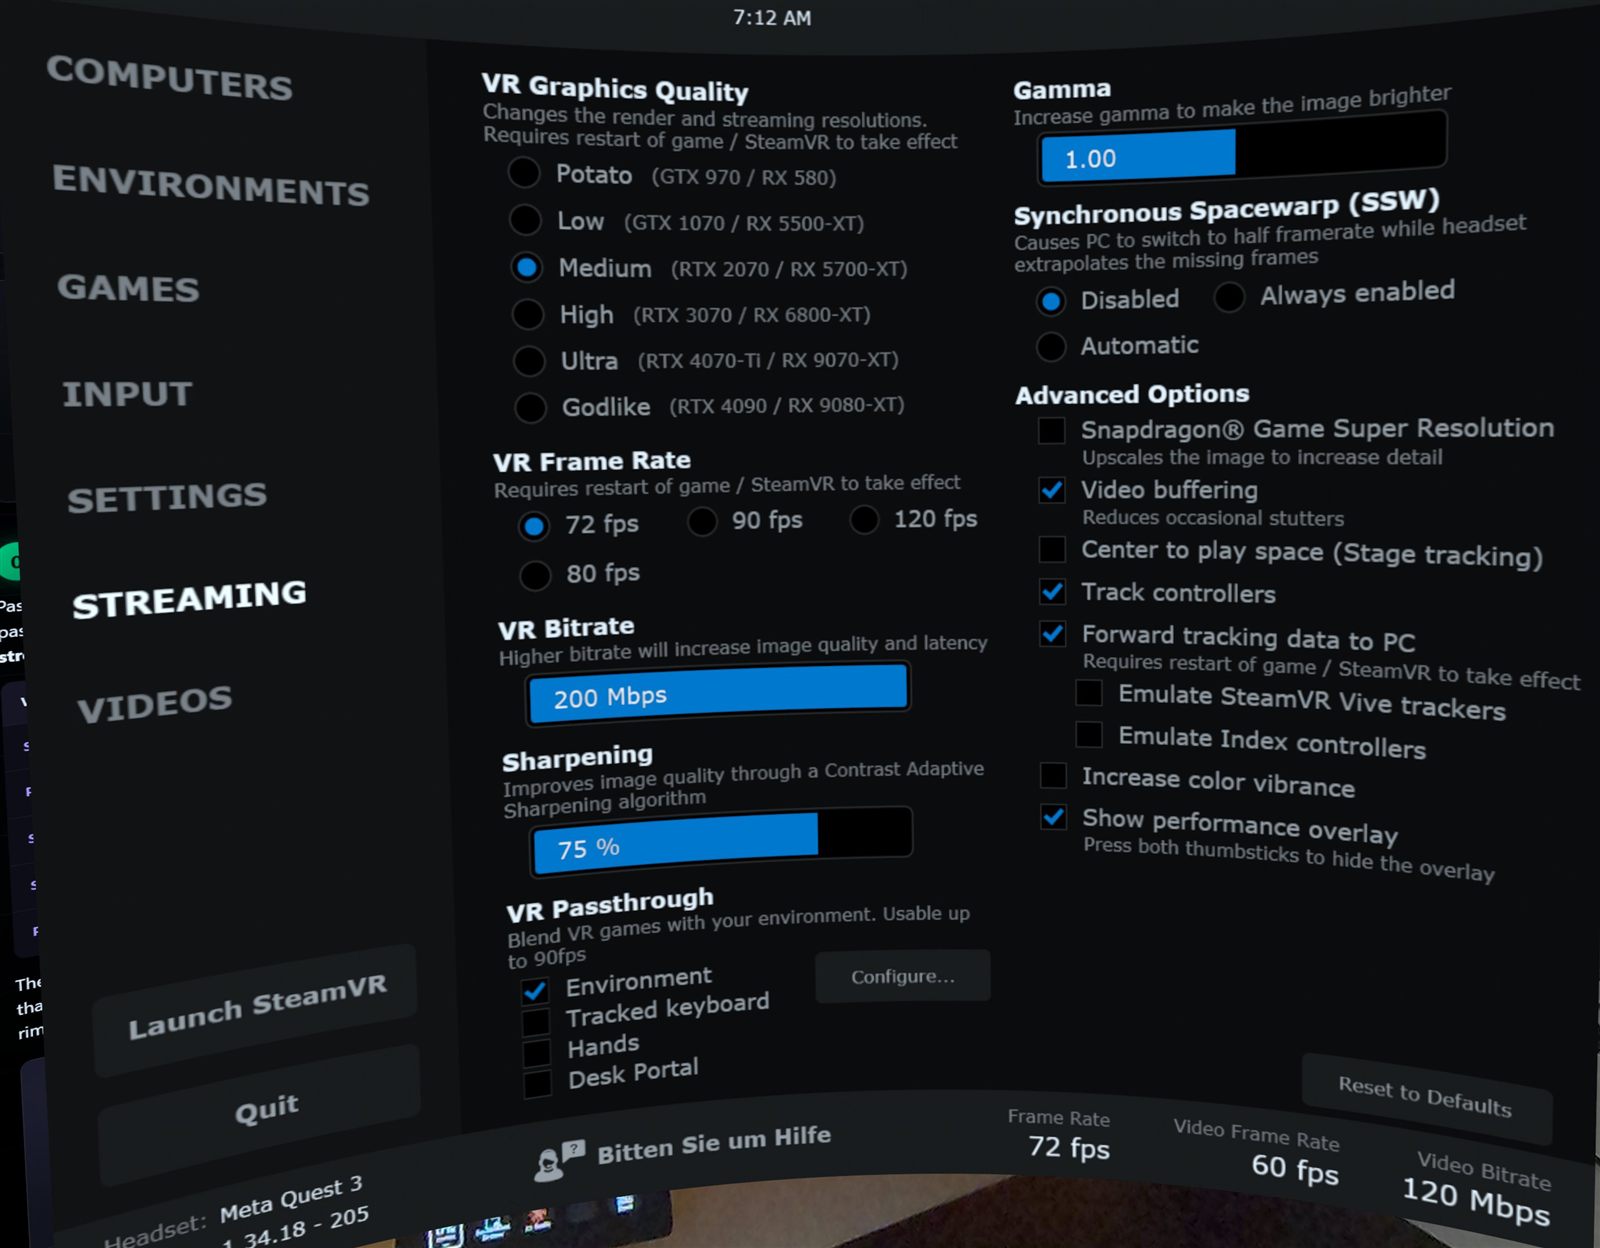
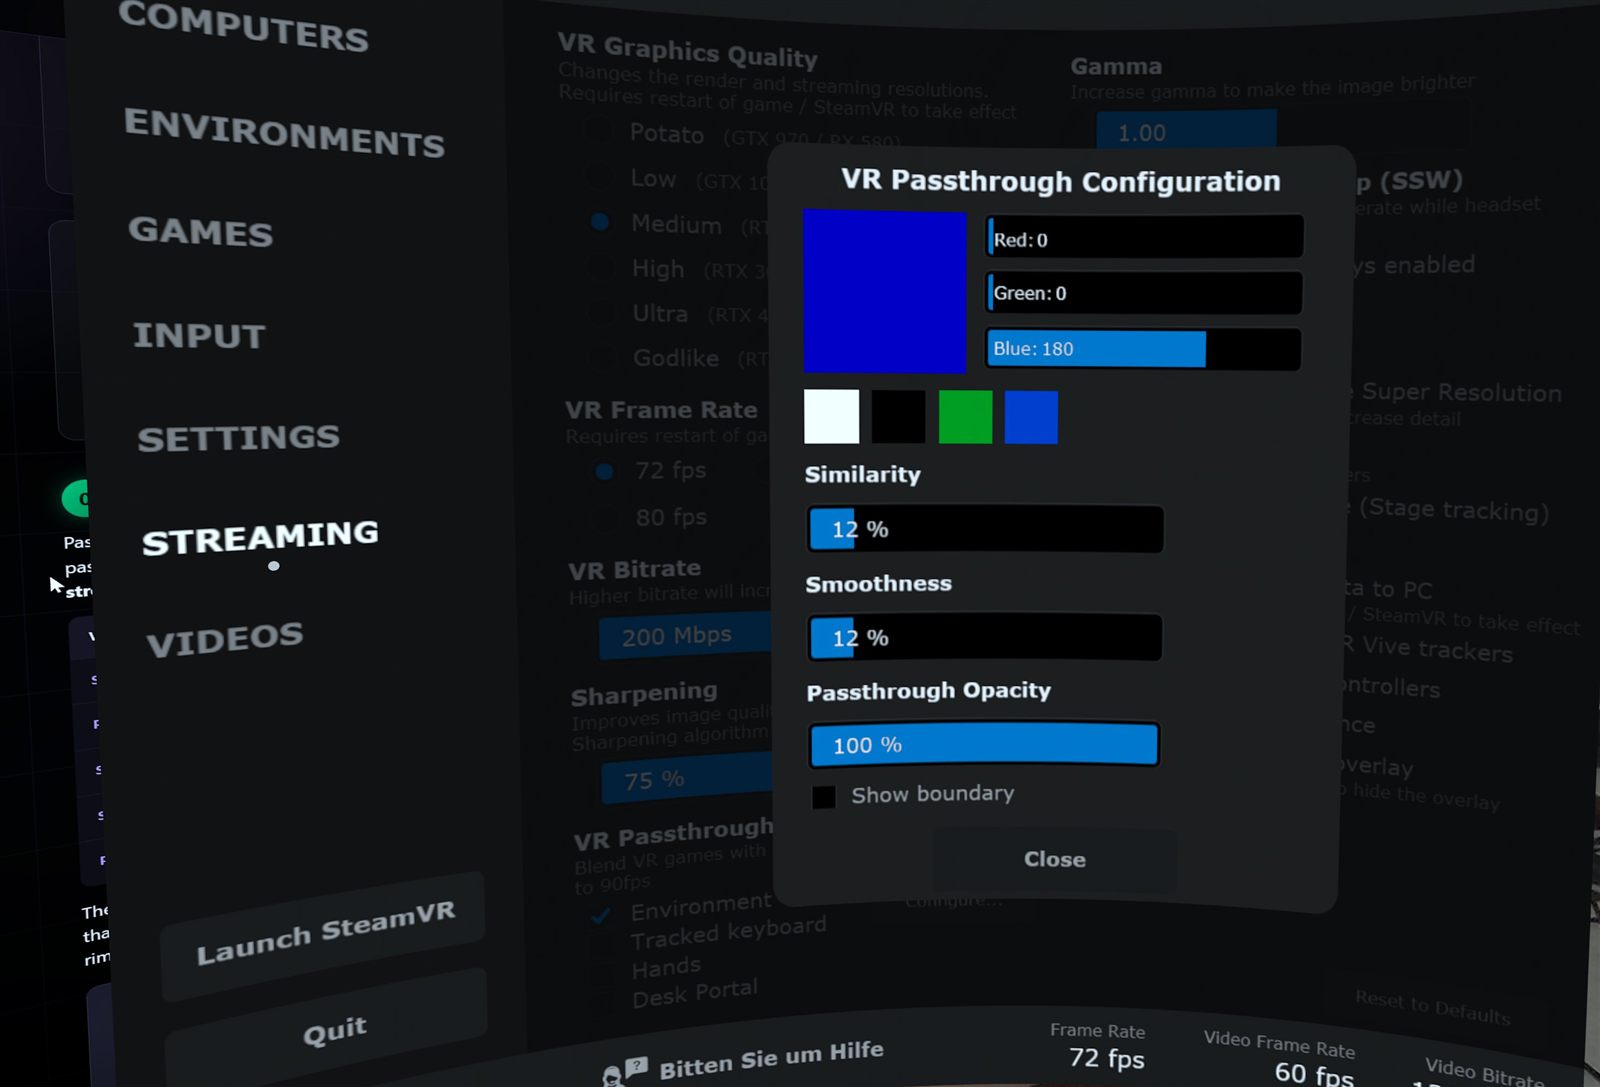
0, 0, 180, Similarity 12%, Smoothness 12%, Passthrough Opacity 100%.0, 0, 180) must also be set inside PassthroughForge under
Settings → Passthrough Color. The editor paints masks in that colour,
and Virtual Desktop only swaps that exact colour for camera pixels - a mismatch is
the #1 reason masks appear as a solid colour instead of see-through.
The edge of every mask is where Virtual Desktop swaps the key colour for the real cameras. VD streams the whole VR image to your headset as compressed video, and that compression slightly smears the colour boundary - which can show up as a pink/magenta fringe around the cutout. It's a property of the Virtual Desktop streaming pipeline, not PassthroughForge, so you can't remove it in the app - but you can tune it down to almost nothing. The levers, in order of impact:
| Setting | Why it matters |
|---|---|
| VD Codec → HEVC (ideally HEVC 10-bit) | The single biggest factor. 10-bit carries colour far more precisely than H.264 / 8-bit, so the deep-blue key barely bleeds into the edge. H.264 is the usual cause of a strong pink line. |
| VD Bitrate → as high as your link holds | Low bitrate = heavy compression = more fringe. Push it up and stay on a strong 5 GHz / 6 GHz signal near the router. If your Wi-Fi is the bottleneck, this is often the real culprit. |
| VD Runtime → VDXR (not SteamVR) | VDXR is the most direct path. SteamVR adds an extra compositor pass that softens the edge and widens the fringe. |
| VD Smoothness → keep it low (12 %) | High smoothness feathers the key edge into a wide halo; a low value keeps the cut tight. |
| PassthroughForge Black Border → 2-3 px | In the mask editor's Border panel. It overwrites the very edge band with black, so any remaining fringe reads as a thin dark outline instead of glowing pink. |
With a good pipeline (HEVC 10-bit, VDXR, high bitrate) the cockpit edge comes out essentially clean. A strong pink outline almost always means H.264, a low bitrate, SteamVR, or the Black Border switched off.
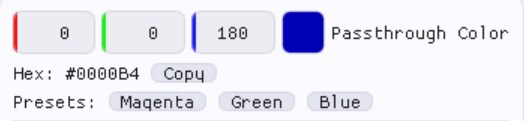
0, 0, 180.Do this now, before you start - otherwise the mask follows your hand instead of the controller:
- Turn Hand Tracking OFF - Virtual Desktop streamer → Streaming tab.
- Turn Body Tracking OFF - Quest → Settings → Movement Tracking: set Controllers only, Body Tracking off.
Install & launch
🖥️ At your PC
Run SetupPassthroughForge-vX.YY.exe and follow the wizard, then start
PassthroughForge from the Start menu. The desktop window below opens - it's
your workspace, and everything you do here shows up live in your headset
once you're inside a VR game (see the note).
⚠️ Masks only appear when you are actually inside a VR game
PassthroughForge draws into the VR frame that a game hands to your headset. So masks show up only when a sim is running in VR — DCS in VR mode, or MSFS in VR mode. That's when there's a frame for PTF to draw into.
Virtual Desktop on its own does not show masks. Just seeing your Windows desktop (or the PTF window) through Virtual Desktop is not a VR game session — there's no game frame yet, so nothing appears. Launch the sim and switch it into VR mode first; the masks come in then.
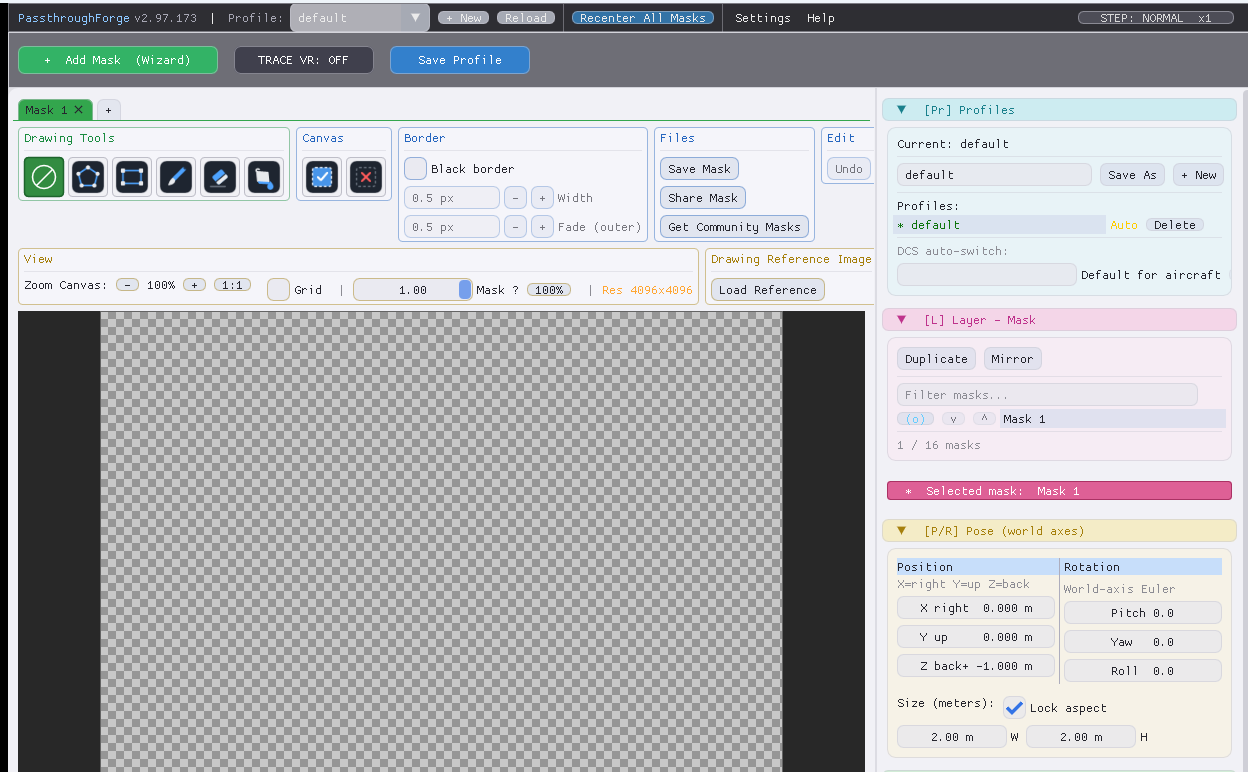
Create an empty mask
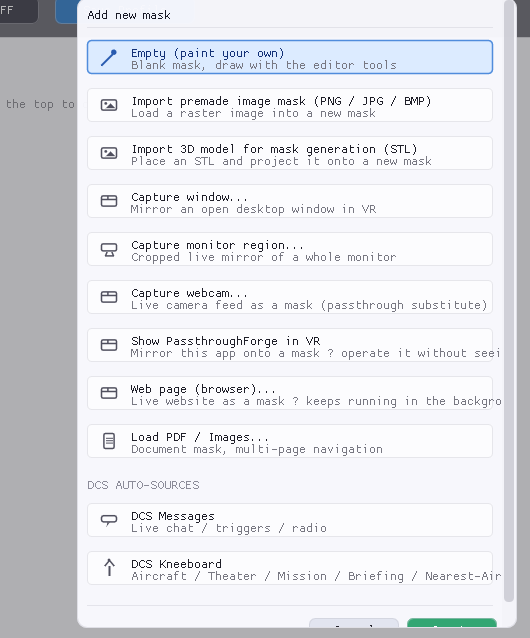
🖥️ At your PCClick the green + Add Mask (Wizard) button and choose Empty (paint your own). This creates an empty canvas on which you'll paint your mask yourself, using the various drawing tools.
Trace VR: switch on your canvas
🖥️ At your PCThe idea behind Trace VR — read this first
A finished mask is an invisible hole in your VR view. That's perfect for flying — but impossible to position: you can't line up a hole you can't see against your real cockpit. So how do you draw the cut-out exactly over your throttle or keyboard? Trace VR is the mode that solves this.
Think of it as tracing paper (that's where the name comes from). It lays your whole mask canvas over the real world as a solid, visible sheet, so you can see your cockpit through it and paint the cut-out shape straight onto your real hardware. Switch Trace VR back off and that painted shape becomes the actual see-through window — exactly where you drew it. Draw with the sheet on, lift it off, the hole stays.
In practice: still at the desktop, press TRACE VR - the button sits in the top bar of the desktop window (bindable to a key too). Here's exactly what toggling it does:
- With Trace VR ON, the whole canvas becomes visible in VR, laid over the real world - so you can see the contours of your cockpit through it, ready to trace.
- Whatever you paint with a drawing tool appears on that canvas in a solid colour - so you can see the shape clearly and align it precisely against the real cockpit.
- Press Trace VR again when you're done: the painted mask turns transparent (your actual see-through window) and everything else becomes invisible - the normal flying view.
Switching Trace VR on also brings up a floating dock in the headset with everything you need - the mask tabs, the drawing tools, Add/Subtract, and the Face Me, Save and Trace VR buttons. Without Trace VR on, there is no menu to see in VR - so press it now, then put the headset on and never reach back to the desktop.

Rough-align with Face Me
🥽 In VRLook toward the area you want a window into - say your cockpit dashboard - and press Face Me on the floating dock that just appeared. This snaps the blank plane squarely in front of you, facing your head, roughly over that area. Think of the canvas as a sheet of tracing paper you lay over a drawing you want to trace - Face Me is you placing that sheet over the cockpit. It's the coarse alignment step: you're not placing it perfectly yet, just getting the sheet sitting over the cockpit so you have something to trace against. (You can press Face Me again any time the plane drifts out of view.)
With the plane sitting over the cockpit, here's the key: whatever you paint appears right there on it. You paint with your mouse: the mouse cursor on the desktop editor's canvas is mirrored into the VR view, so you see exactly where you're drawing without taking the headset off. Then draw your shape directly onto what you see, tracing the real cockpit opening edge for edge. Pick a drawing tool (next step) and start painting.
The drawing tools
🥽 In VREverything you paint becomes transparent (passthrough); everything you leave blank stays hidden. Pick a tool from the Drawing Tools card:

| Tool | What it does |
|---|---|
| None | Canvas clicks do nothing - the safe state for nudging the mask with shortcuts without drawing by accident. |
| Brush | Paint a soft circle. A size slider appears next to the tools. |
| Eraser | Like the brush, but removes pixels (always erases). |
| Rectangle | Click & drag a clean rectangle - perfect for a keyboard or kneeboard window. |
| Fill | Bucket flood-fill of a connected area. |
| Polygon | Free-form shapes with curves and mirroring - see step 7. |
Add & Subtract
🥽 In VRWhen a painting tool is selected, a Mode toggle appears: Add fills with passthrough (makes it see-through); Subtract clears pixels, cutting a hole back out. Subtract works with Brush, Rectangle, Polygon and Fill - so a filled rectangle in Add followed by a smaller one in Subtract gives you a clean frame in two drags.
The Polygon tool
🥽 In VRFor shapes that follow the cockpit exactly, use the polygon tool. Each click places a vertex; right-click on empty canvas applies the shape. The vertices are saved with the mask, so you can re-edit it later.
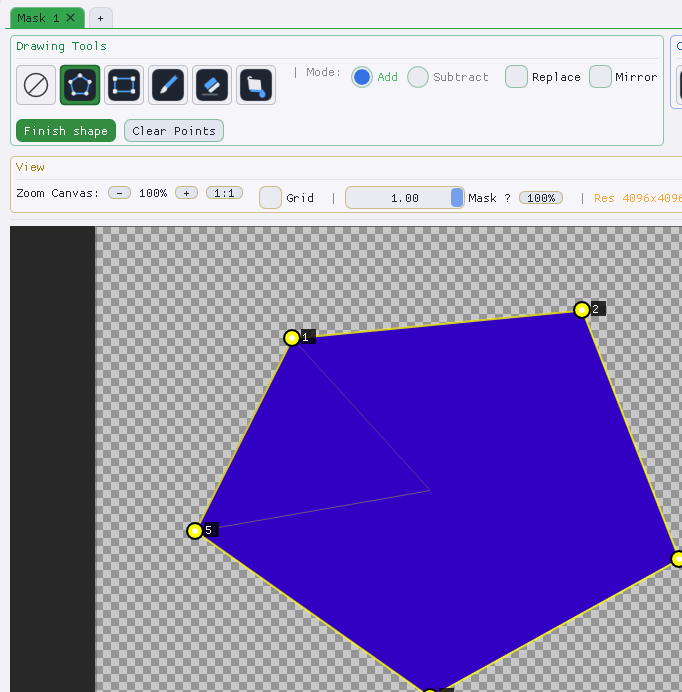
And stick to one shape per canvas. If you draw a polygon and then paint a second shape onto the same canvas with another tool (say, the Rectangle), you lose the ability to re-edit the original polygon via Edit shape. Need a second see-through window? Create a second mask (its own tab) and draw it there.
Editing points
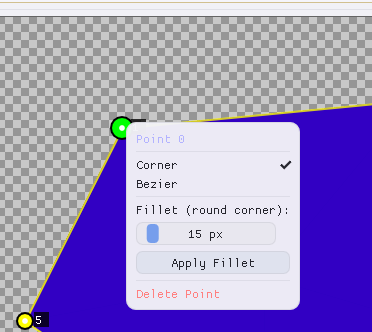
A finished shape is never locked. Because the vertices are saved with the mask, you can reopen the outline at any time - even days later, after reloading the profile: press ✎ Edit shape - it sits in the same spot where Finish shape was (VR dock and desktop tools card) whenever the selected mask has a saved polygon. All your vertices come back exactly where you placed them, ready to edit: drag points to nudge the outline, or right-click a vertex for the menu below - switch it between Corner and Bezier (curve), round it off with Fillet, or Delete it. When you're happy, press Finish shape again and the updated outline is applied to the mask.
| Action | Result |
|---|---|
| Drag a vertex | Moves that point. |
| Right-click a vertex | Menu: Corner / Bezier, Fillet (rounded corner) and Delete. |
| Right-click an edge | Inserts a new vertex. |
| Drag a Bezier handle | Bends the curve at that point. |
| Hover + Del | Deletes the vertex under the cursor. |
| Esc | Cancels the in-progress polygon. |
Mirror mode
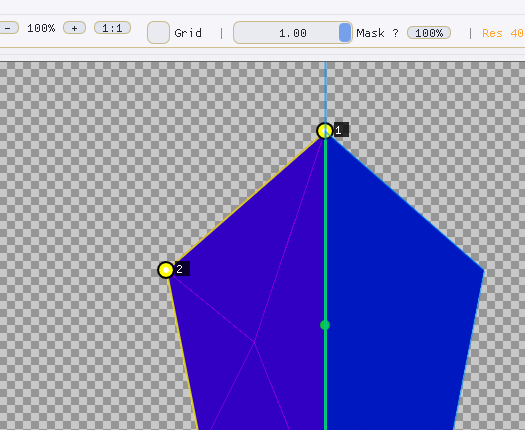
Most cockpit openings are symmetric - a canopy frame looks the same left and right. Mirror mode exploits that: with the Polygon tool selected, tick ☐ Mirror in the Drawing Tools card - it's the last option in the Mode row, right next to Add / Subtract / Replace (you can see it in the editor screenshot at the top of this step). From then on you only have to draw one half. Your first vertex sets a vertical mirror axis (the teal line in the screenshot below); from then on, every vertex you place is duplicated live onto the other side - below, the left half is the side being drawn, the right half is its automatic mirror image. When you press Finish shape, both halves are applied in one go, and Bezier curves and fillet roundings are mirrored correctly too. The result: a perfectly symmetric cut-out with half the work, and none of the wobble you'd get drawing both sides freehand.
Fine-tune position & size
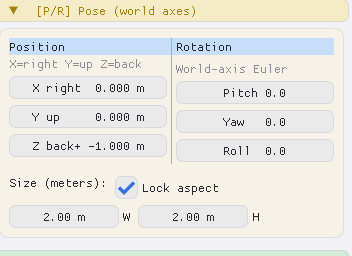
🥽 In VRYour mask is drawn - but it's a plane floating in the room, and Face Me only got it roughly into place. Now you'll usually want to fine-tune where exactly it sits: push it deeper into the scene or closer to you (Z depth), shift it up/down or left/right, tilt its rotation until it lies flat on the real cockpit, or resize it. There are two ways to do that:
Way 1 - the menu: open [P/R] Pose (shown below): Position (X right, Y up, Z back) moves the mask, Rotation tilts it, and Size (meters) NEW at the bottom sets how big it is in the world (leave Lock aspect ticked to scale evenly).
Way 2 - the keyboard shortcuts (our recommendation): instead of dialing numbers, tap the shortcuts from the next step and watch the mask glide into place live in the headset - nudge, tilt and scale in small steps until it hugs the real cockpit. It's faster, and you never have to think in metres.
Keyboard shortcuts
🥽 In VRThe fastest way to nudge a mask is the keyboard, while you watch it move in VR. Shortcuts act on the selected mask. Tap Q for a fine step and E for a coarse step - the STEP pill (top-right) shows the current size.
| Action | Default keys |
|---|---|
| Move left / right | Ctrl+← / Ctrl+→ |
| Move up / down | Ctrl+↑ / Ctrl+↓ |
| Move forward / back | Ctrl+PgUp / Ctrl+PgDn |
| Pitch / Yaw / Roll | Ctrl+Num 8/2 / 4/6 / 7/9 |
| Scale up / down | Ctrl+Num + / Ctrl+Num − |
| Step size: fine / coarse | Q / E |
| Select next / previous mask | Ctrl+Tab / Ctrl+Shift+Tab |
| Show / hide a mask (1–8) | Ctrl+F1 … Ctrl+F8 |
| Show / hide all masks | Ctrl+F9 |
| Recenter all masks in front of you | Ctrl+Del |
| Move all masks together (Global) | add Alt: Ctrl+Alt+arrows / numpad |
| Show / hide the PSF window | Ctrl+F12 |
Pro tip: bind Recenter All Masks to the same HOTAS button as your sim's own VR recenter (DCS "Recenter VR View" / MSFS VR Camera Reset) - one press then re-aligns your cockpit view and your masks together.
Save your profile
🥽 In VRA profile is a whole set of masks - keep one profile per aircraft and switch between them anytime. There are two places to manage them: the quick buttons in the top bar, and the full [Pr] Profiles panel where you name and organise them.
The quick way - top bar
For everyday saving, use the top bar. Save Profile writes your current masks back to the loaded profile (it's on the VR dock too, so you can save without taking the headset off). + New starts a fresh profile, Reload NEW throws away unsaved changes and restores the last saved state, and the Profile dropdown switches between your saved profiles.
Naming & organising - the [Pr] Profiles panel
Open the [Pr] Profiles section in the right-hand panel to give a profile a proper name and manage the whole list:
![The [Pr] Profiles panel: profile name textbox, Save As, + New, the profile list, Set Auto and Delete.](screenshots/panel-profiles.jpg)
| Control | What it does |
|---|---|
| Profile name textbox | Type the name here (e.g. F/A-18C). It's pre-filled with the loaded profile's name - edit it to rename or to spin off a variation. |
| Save As | Saves your current masks under the typed name. If that name already exists it's overwritten (no prompt), so a new name = a new profile. |
| + New | Creates a fresh, empty profile - uses the typed name if you gave one, otherwise auto-names it "Profile N". |
| Profile list | One row per profile - click to load it. The loaded one is highlighted green; a ★ marks the auto-load default. |
| Set Auto | Marks that profile as the one that auto-loads on next launch (only one can be the default). |
| Delete | Permanently removes the profile file - no undo. |
Next flight: re-align everything in 30 seconds
🥽 In VRYour masks are built and saved - so what does the next session look like? This is the routine once everything is set up (example: DCS):
- Don't reset your playspace. No headset recenter, no Guardian redraw - the whole point of the one-time-recenter rule at the top is that your playspace is already where it should be. Just sit down in your usual position.
- Start PassthroughForge and DCS, put the headset on and wait until you're in the main menu. Your profile loads with all saved masks.
- If a mask isn't sitting exactly on the real cockpit, press Recenter All Masks (Ctrl+Del, the VR dock, or your bound button). The masks re-plant themselves relative to where your head is at that moment - so press it while sitting in your normal position.
- Still slightly off? Move your head a touch and press again until the mask lines up with the real cockpit. This also works in depth: lean forward or back a little before pressing to nudge the mask closer or further away.
- In the mission, align the virtual cockpit to your real cutout using DCS's cockpit camera / seat position binds. Tip: map them to a Stream Deck so you can nudge the seat comfortably without hunting for keys.
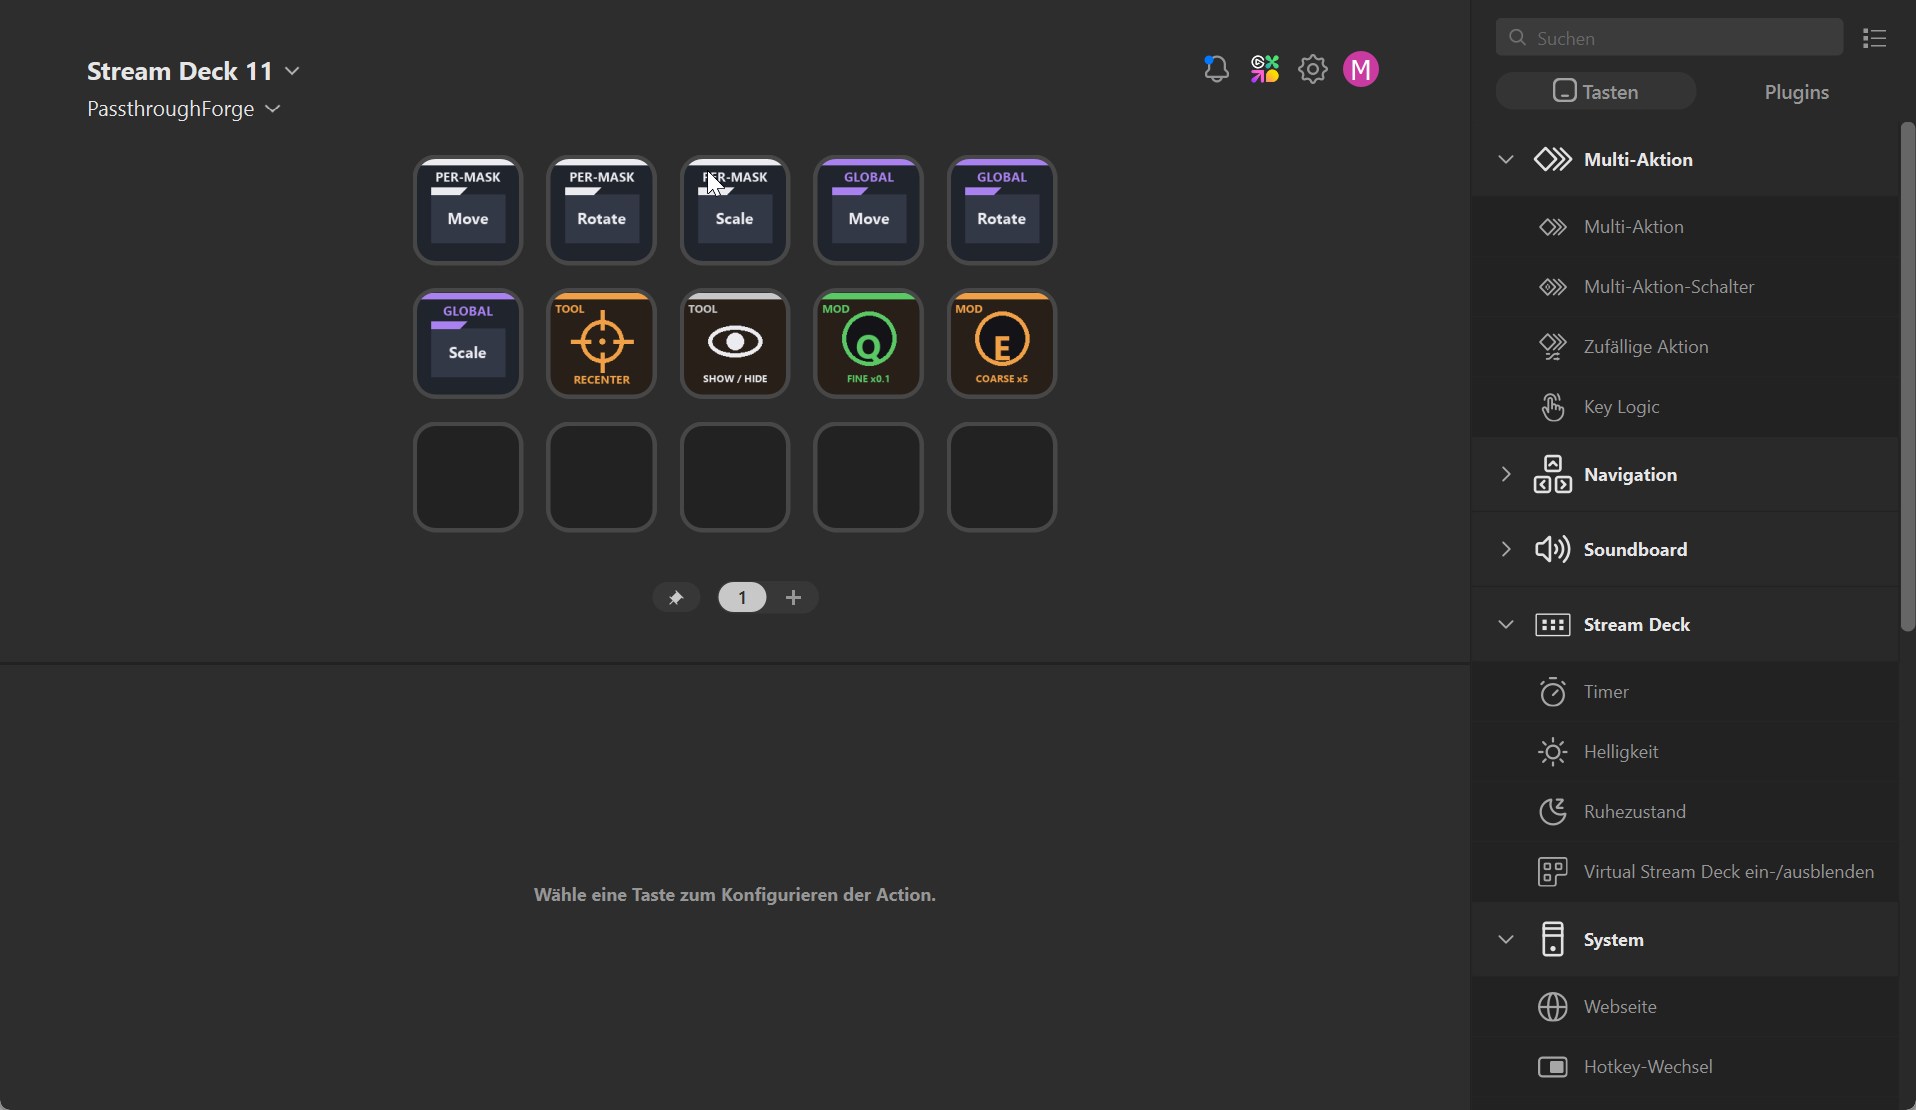
- When the virtual cockpit matches the real cutout, save that seat position as the default in DCS with RAlt+Num 0 - from then on DCS puts you in exactly that spot every time.
Where to next
That's the full first-mask workflow. The natural next step is turning a controller into a fixed reference so your mask always lines up:
🎮 Recommended next guide Controller Tracking → Mount a controller on your rig as a fixed reference and snap your mask back into perfect alignment anytime - Place & Release, calibrated offset, one-button reset.More to explore: