Every mask can be bound to your left or right Quest controller. In this guide we use that for one big win: the controller is installed permanently on your rig and serves as the mask's ground truth. You set it up and calibrate it once - from then on the mask is always re-alignable, no matter what the playspace does. The guide walks you through the one-time setup first, then the daily ritual: press Reset to controller, tap the controller awake, done.
DCS (or another VR app) has to be running in the background so the controller is tracked (step 2), but you carry out every step at the desktop - you only slip the headset on to check the mask lines up. Steps 0-1 set up; steps 2-4 bind and calibrate the mask; step 5 is the daily re-align.
One-time setup: tracking prerequisites
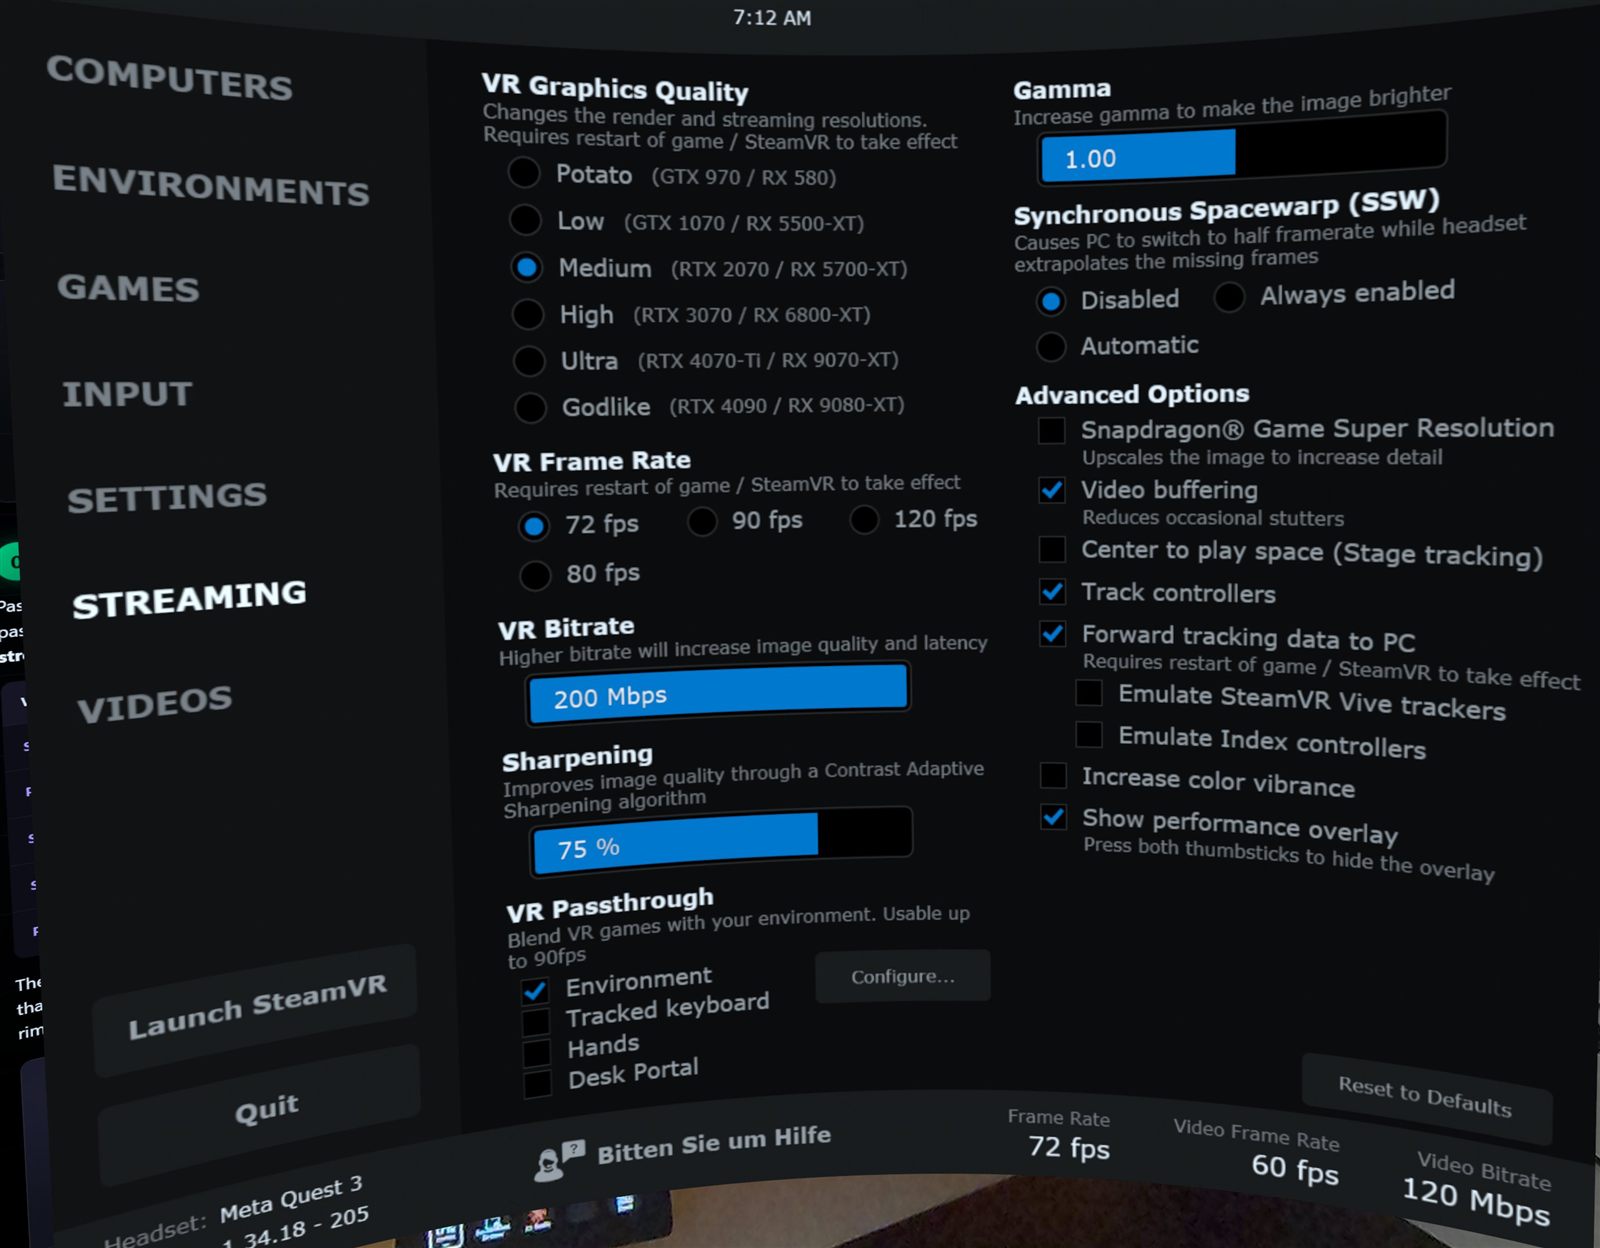
🖥️ At your PCFor PassthroughForge to see your controllers at all, Virtual Desktop has to track them and forward the data to the PC - and the Quest must not silently replace the controller pose with a hand or body pose. Set these once:
| Setting | Value |
|---|---|
| VD Streaming → Advanced Options → Track controllers | ✓ checked |
| VD Streaming → Advanced Options → Forward tracking data to PC | ✓ checked (restart game/SteamVR after changing) |
| VD Input tab → Automatically hide controllers | ☐ un-ticked |
| Quest → Settings → Movement Tracking | Controllers only |
| Quest → Settings → Movement Tracking → Body Tracking | OFF |
| VD Streaming → Hand Tracking | OFF |
Mount the controller on your rig
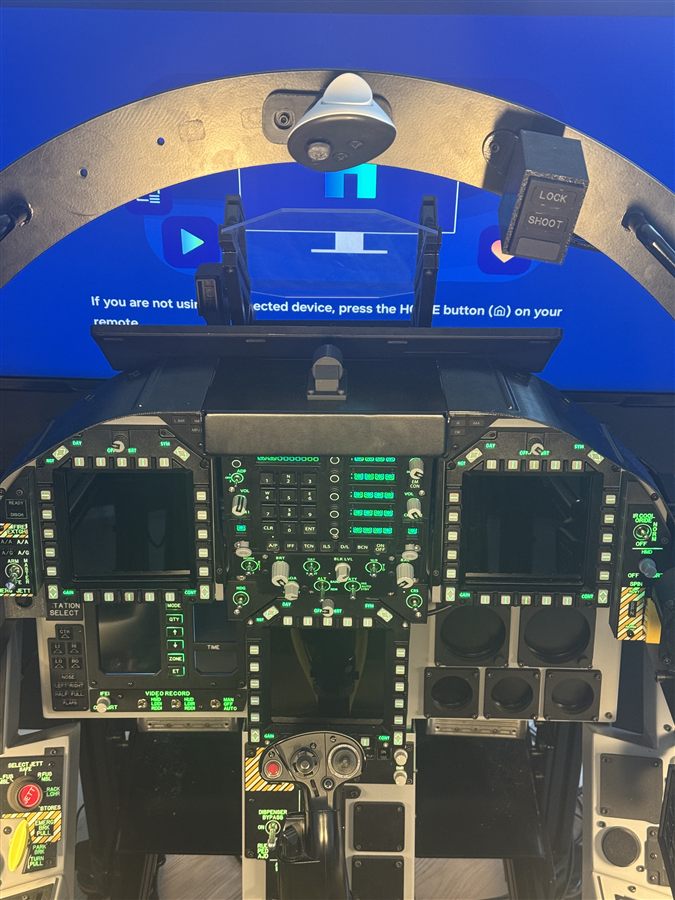
🖥️ At your PCFix the controller rigidly to your cockpit rig - canopy arch, frame, anywhere solid near the mask. Two rules for the mount:
- Keep it in view of the headset cameras. The Quest tracks controllers optically - a controller hidden behind you or under the desk cannot be tracked, and the reset in step 5 needs a tracked pose.
- It must not wobble. The mount is your ground truth: if the controller shifts relative to the cockpit, the mask will re-align to the wrong spot. A solid clamp or strap beats tape - give it a gentle push to check (see the clip).
Bind the mask to the controller
🖥️ At your PCAssigning a controller only works while you are in DCS or any other VR application - controller poses reach PassthroughForge only through the active VR session. Without one the [T] panel shows "no pose" and the binding just waits. So: start the sim, put the headset on once so the session is live, then do this step at your PC.
Select your mask, open the [T] Tracking section in the right-hand panel and set Tracking Target to Real Time Tracking Left Controller or Real Time Tracking Right Controller. Three things happen:
- No jump. The mask stays exactly where it currently sits (a "position takeover") and tracks the controller from there.
- The offset is calibrated automatically. The first takeover stores the controller-to-mask offset as the calibrated reference - the pose "Reset to controller" will snap back to later.
- Place & Release is on by default. Selecting a controller auto-enables both mode checkboxes (step 3), so place → hold still → world-lock works out of the box.
![The [T] Tracking section in PassthroughForge with the Tracking Target dropdown open, showing None (World), Real Time Tracking Left Controller and Real Time Tracking Right Controller.](screenshots/ct-tracking-dropdown.png)
Tick both mode boxes: align once, then world-locked
🖥️ At your PCThe goal of this workflow: the controller is used only at the start of a session to align the mask. After that the mask is world-locked and the controller just sleeps on its mount until the next session. Two checkboxes in the [T] section make that happen - both must be ticked (they are on by default when you pick a controller):
| Checkbox | Why it must be on |
|---|---|
| Auto-freeze when idle | While you align, the mask follows the controller in real time. Once the controller holds still for ~2 s (adjustable: Settings → Auto-freeze delay) or goes to sleep, the mask freezes to a rock-solid world anchor - no jitter, no standby jumps. This is what turns "aligned" into "locked" without you pressing anything. |
| Release to world after placing | After that freeze the mask stays world-locked for good - controller motion will not drag it around mid-flight. The only way it re-attaches is the explicit Reset to controller action (step 5). This is what lets the mounted controller sleep through the whole session without ever touching your mask. |
![[T] Tracking panel with both checkboxes ticked; the Mode line reads Placed and released - world-locked; below it the Calibrate offset and Reset to controller buttons.](screenshots/ct-tracking-placed.png)
With both boxes on, every session follows the same simple pattern: align once at the start, the mask locks itself to the world two seconds later, and the controller goes back to sleep on its mount - done until the next Reset to controller. Here is exactly that moment in action: the keyboard shortcut Ctrl+Shift+Del (Reset ALL Masks to Controller), a tap on the mounted controller - and the mask snaps back:
Calibrate the offset
🖥️ At your PCThe calibrated offset is the stored relationship between the physical controller and the mask - the pose that Reset to controller restores. The first takeover sets it automatically, but after you've fine-tuned the mask (nudged it with the keyboard shortcuts until it sits perfectly on the real cockpit), lock that perfection in: press Calibrate offset in the [T] section.
Daily use: Reset to controller
🖥️ At your PCThis is the whole ritual on a normal flying day, whenever the mask no longer sits where it should (new session, playspace drift, headset re-localised):
- Press Reset to controller - the [T]-panel button, Ctrl+Shift+Del (default, resets all controller masks), or a HOTAS button you bound under Settings → Mask Shortcuts.
- The controller is usually asleep - that's expected. The reset arms itself and waits up to 30 seconds for the controller.
- Tap the controller. It wakes, the headset cameras re-acquire it, and PassthroughForge waits a beat for the pose to settle (a waking controller reports garbage for a moment - the reset only fires on a stable, averaged pose, so the mask can never be hurled across the room by one bad frame).
- The reset fires by itself: the mask snaps to controller + calibrated offset and immediately world-locks there. Done - hands back on the stick.
👆 This is exactly the sequence in the 3D animation up in step 3 (Ctrl+Shift+Del → tap → snap).
🎮 Pro tip: bind Reset to controller to a HOTAS button. Mask drifted mid-flight? One button, one tap on the mounted controller, and everything is back - without touching the keyboard.
Where to next
The opposite workflow: hold the controller and let the kneeboard track your hand live. Getting Started
The full first-mask workflow: Trace VR, drawing tools, profiles. All guides
Step-by-step setup and feature guides, kept up to date. Join the Discord
Ask questions, share masks and report bugs.